As an analyst, marketer, or SEO, you probably have some go-to reports you are used to looking at in Google Analytics. You may have them bookmarked or have memorized the three or four clicks you need to get the right report from Universal Analytics.
Now that it will soon become Google’s default analytics tool, let’s look at how to create three common and useful reports for SEO in Google Analytics 4.
1. Traffic acquisition report
This one is quick and straightforward – only one click in the GA4 interface will get you the Traffic acquisition report, aka the session acquisition report (there is acquisition by both user and session in GA4).
Here’s where you can quickly analyze the different channels bringing traffic to your site.
In the reporting UI, you’ll find this report under Life cycle > Acquisition > Traffic Acquisition.
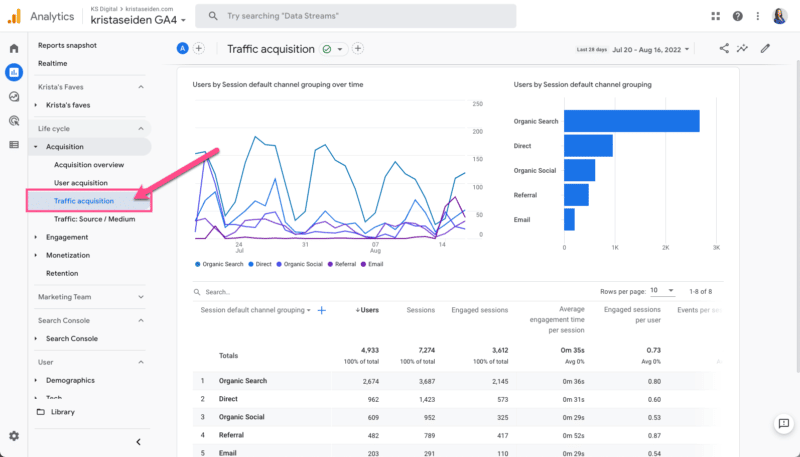
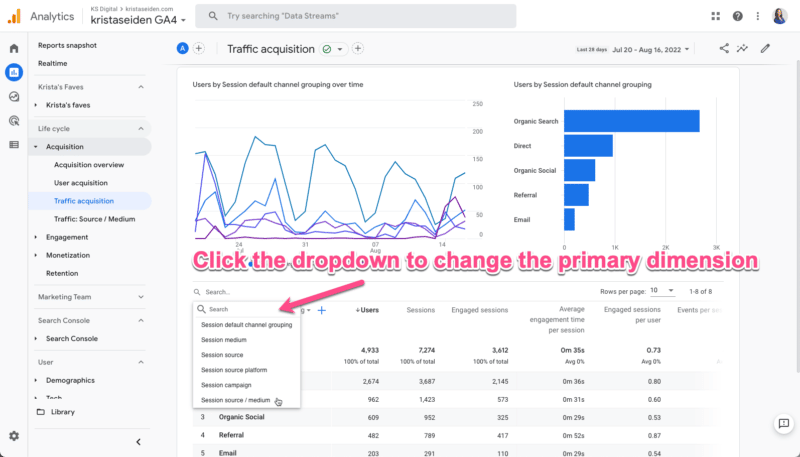
Note that this report initially defaults to use the Session default channel grouping as the primary dimension. Still, you can change this to a different view of traffic acquisition if preferred.
For example, you can select Session source / medium which was a default report in the UA navigation.
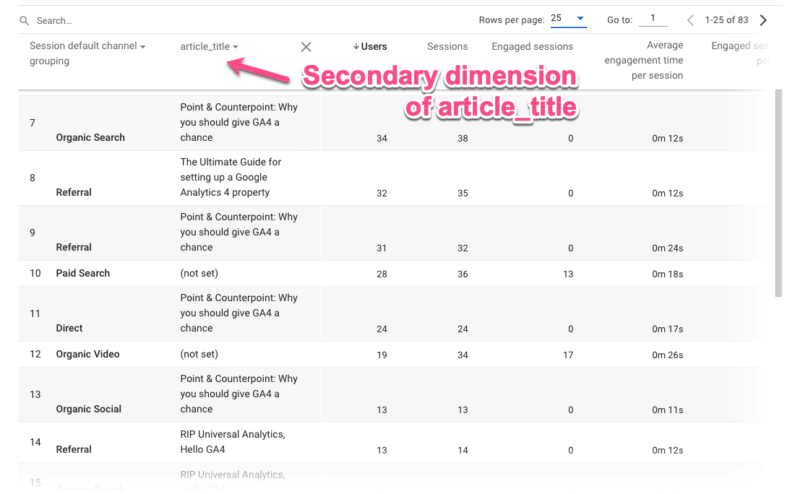
You can also break this report down by additional dimensions, including custom dimensions.
Let’s say you collect custom dimensions on your blog for things like article title, article tag, article date, and so on. This then gives me the ability to analyze article performance by channel.
Finally, you can use the filter box above the table if you want to filter this report for just Organic Search as a channel.
Note that the filter box currently references both the primary and secondary dimensions. Unlike UA, there is not (yet) the ability to filter on a single dimension in a table.

2. Google Search Console reports
If you are using the Google Search Console integration (and you should be!), you will have a new collection of reports available to publish to your reporting navigation menu.
Once you have this setup, you’ll see two reports:
- The Google organic search traffic report.
- The Queries report.
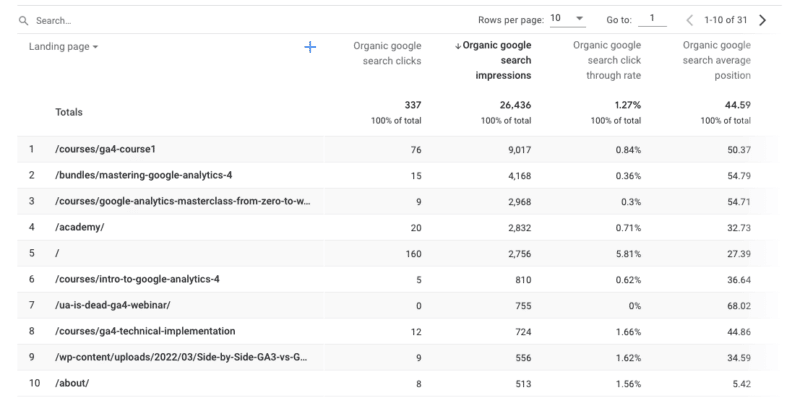
Note that in my screenshot below, I’ve renamed these reports (via the customization feature) to be a bit more meaningful to me, so they are called “SC: Organic Keywords” and “SC: Landing Page.”
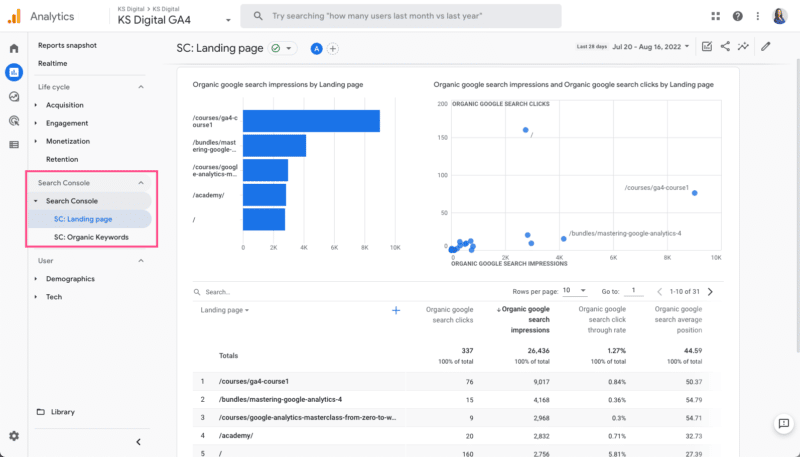
These reports show pretty much what you’d expect. The Landing page report displays SEO-specific metrics such as:
- Organic Google search clicks.
- Organic Google search impressions.
- CTR.
- Avg Position.
The Queries/keyword report shows the same metrics against the actual search query (as opposed to the Landing page in the previous report).
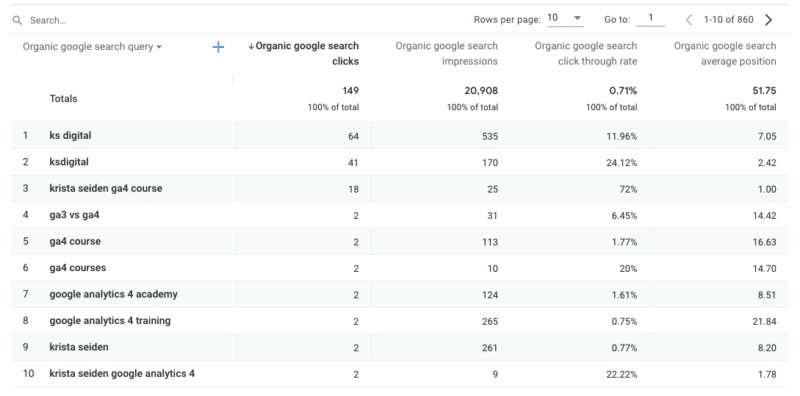
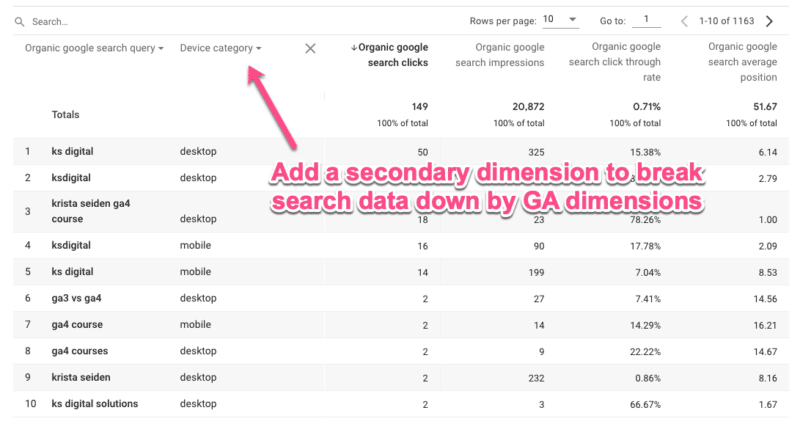
While these reports won’t replace your GSC data, they are a nice addition to GA4, especially when you add secondary dimensions of web traffic when analyzing organic search data.
For example, I can break down my search queries by Device category.
3. SEO landing page report
I saved the best for last – building a customized SEO landing page report.
In a previous article, I covered a quick 10-step process for creating a landing page report in GA4. The landing page dimension is available out of the box, but there isn’t (yet) an out-of-the-box report specifically for landing pages, so you’ll need to create it yourself.
Now, I want to show you how to tailor your landing page report to just show organic traffic.
Sure, you could just add either default channel grouping or source / medium to your current landing page report. But taking a few moments to further customize will save you that click and allow you to then break down your SEO landing page report by an additional dimension in the reporting UI.
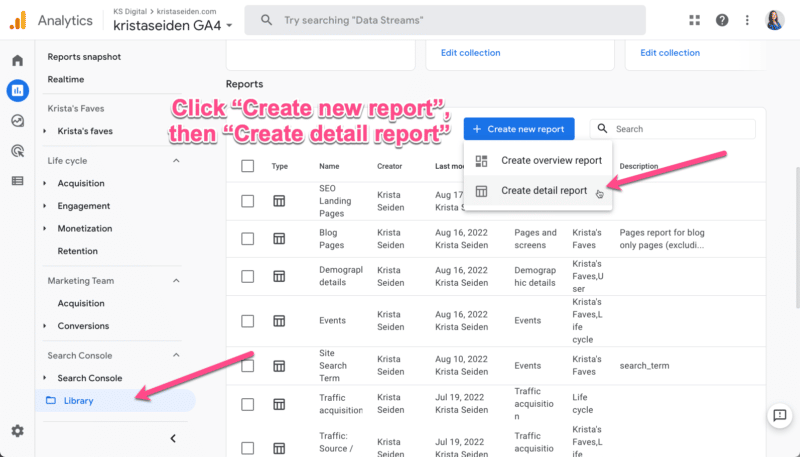
Step 1: Via the Library section, create a new detail report.
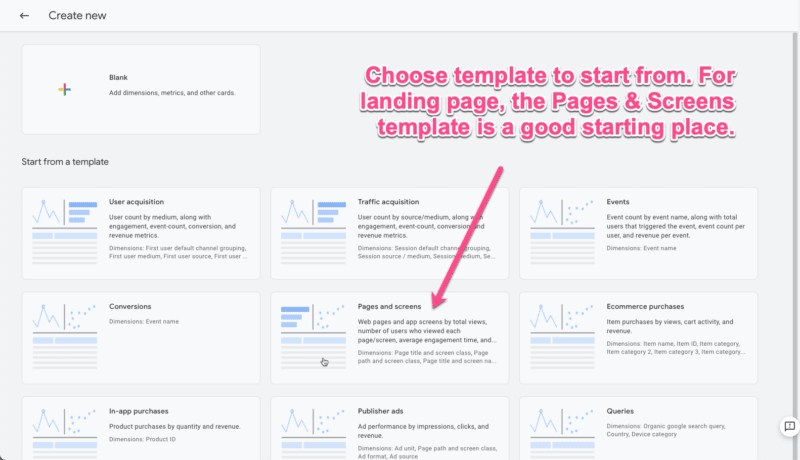
Step 2: Next, you’ll need to choose a template to start from. You can select a blank template or one of the pre-populated templates. These will all start as a copy of the basic report for the subject area.
For example, the Traffic acquisition template will be a copy of the Traffic acquisition report. For this scenario, we’ll start with the Pages and screens template.
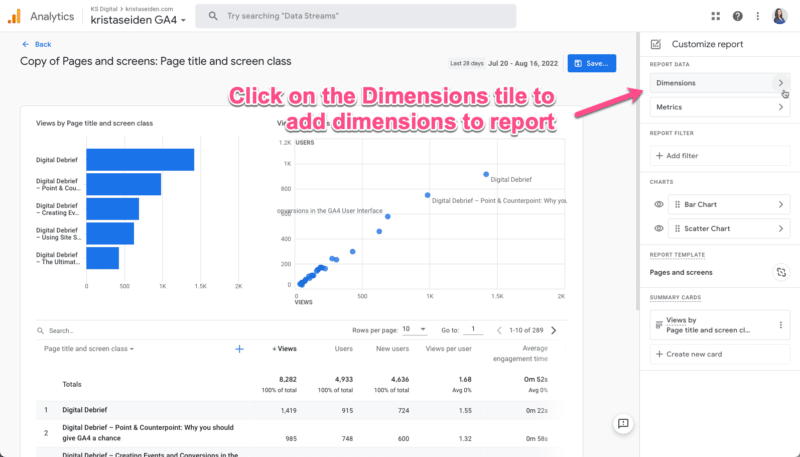
Step 3: Once in the report template, click on the Dimensions tile in the upper right corner to select additional dimensions to add to the primary dimension column.
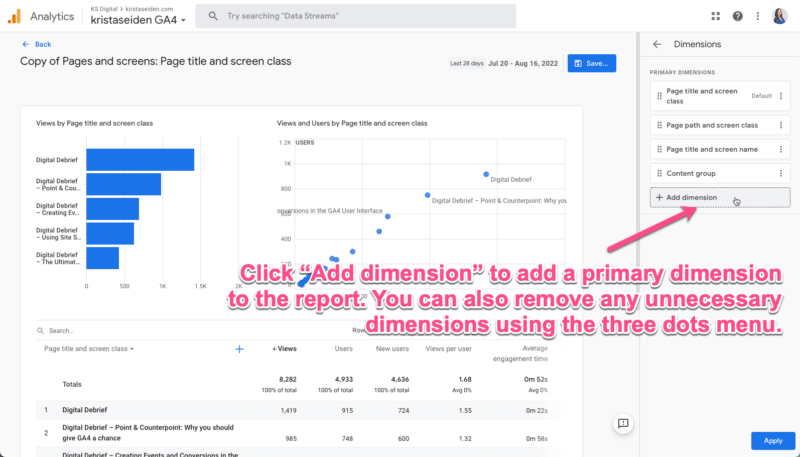
Then click Add dimension.
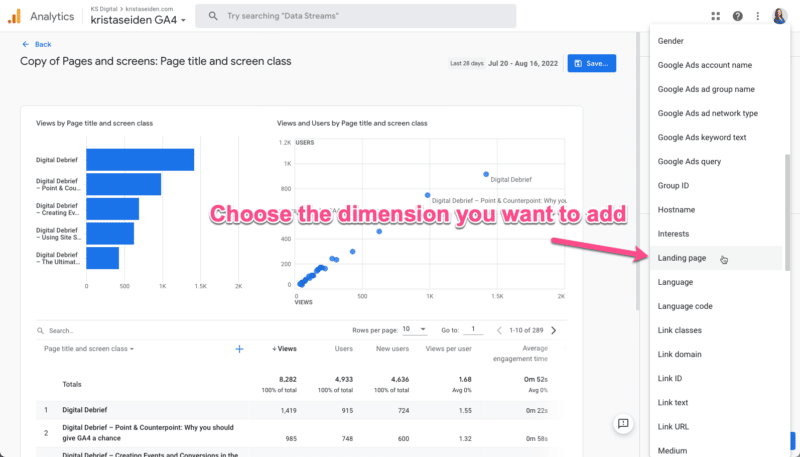
From the dropdown list, choose Landing page.
Step 4: Once you’ve added the Landing page dimension, you’ll want to make it the primary dimension in the report.
To do so, click the three dots menu and select Set as default. Then click Apply to save changes.

Step 5: Now comes the fun part (everything up until now was just a walk-through of making the landing page report from scratch!).
We’re going to use a brand new feature in GA4 called Report filter to filter this landing page report to only show us data that came from organic traffic.
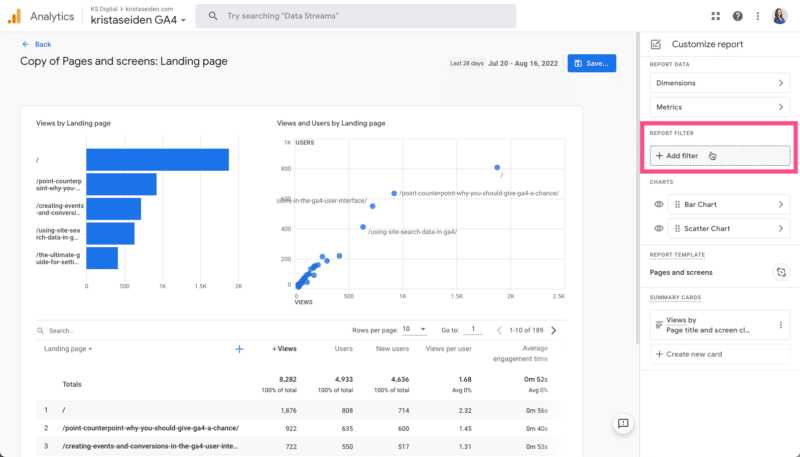
Step 6: When you click the Add filter button, you’ll find a condition builder for your filter settings. For this particular filter, we want to:
- Choose Include, which acts as an include-only operator.
- Select the dimension we want to filter on. In this case, the Session default channel grouping. Then select from a dropdown list which channels to include. We’ll choose only Organic Search.
Hit OK and apply.
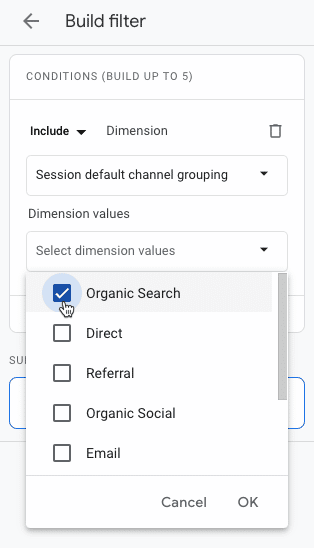
This will now filter the landing page report to only show traffic that has come from organic search.
A couple of other quick things I like to do with custom reports is to change the visuals. I prefer to hide the scatter plot and change the bar chart to a line graph. You can do this in the Charts section of the editor.
Once you’re done, save the report and give it a name. I’ll call this one my “SEO Landing Pages report.”
You’ll also know this is a filtered report because it shows a little filter icon in the upper left-hand corner of the report.
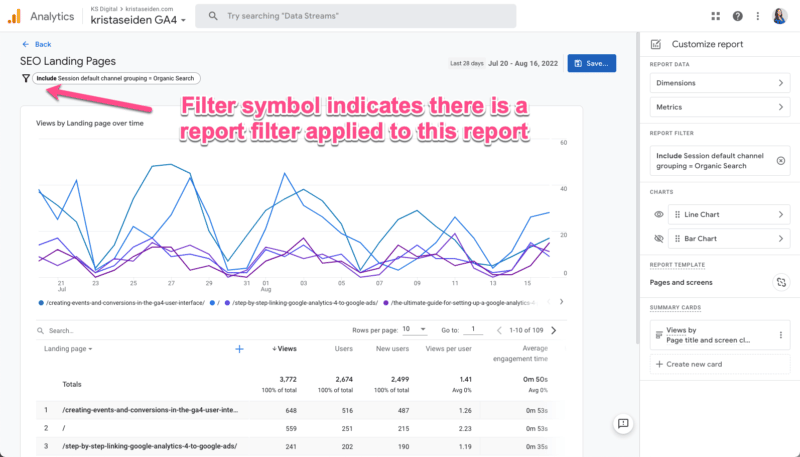
Don’t forget to add this new report to one of your report collections in the Library so it will appear in your left-side navigation bar.
Hopefully, these quick examples of common SEO reports are a helpful way for you to get more familiar and comfortable with GA4.
The post 3 valuable Google Analytics 4 reports for SEOs appeared first on Search Engine Land.


